一、为什么要用oss
将网站的静态资源存储在oss上,静态资源包括网站图片,html,js,css文件,通过cdn将静态资源分布式缓存在各个节点上实现就就近访问,提高用户访问的响应速度.
二、oss怎么用
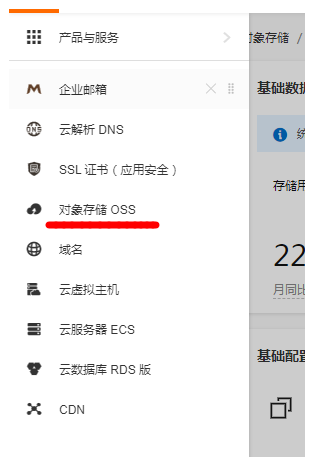
1.在阿里云产品与服务找到-对象存储oss

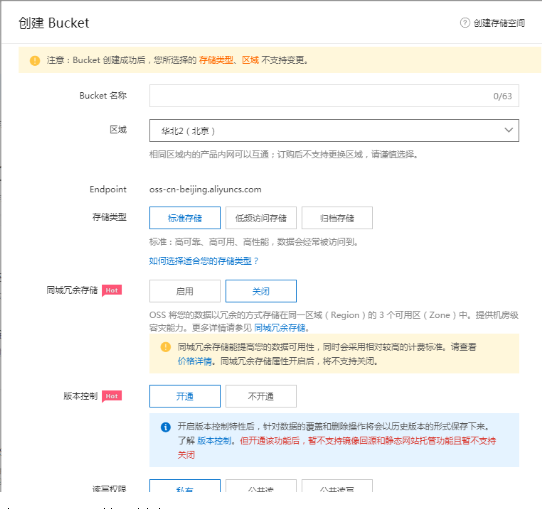
2.创建Bucket设置该读写权限(ACL)为 公共读

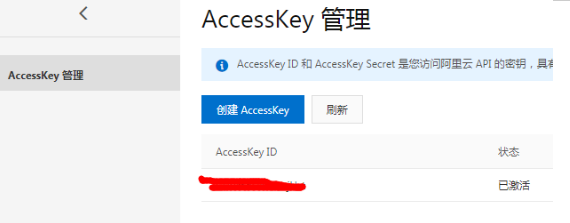
3.在AccessKey 管理创建AccessKey


三、创建上传控制器
class AliossController extends FwadminController {
private $oss_host = 'https://youboxunguanwang.oss-cn-shenzhen.aliyuncs.com';//'https://yifajian2020.oss-cn-beijing.aliyuncs.com';//阿里云oss 外网地址endpoint
private $oss_key_id = '';//阿里云oss Access Key ID
private $oss_key_secret = '';//阿里云oss Access Key Secret
private $oss_bucket_name = '';//创建的bucket名称
private $oss_endpoint = 'oss-cn-shenzhen.aliyuncs.com';//阿里云OSS外网地址
/*
* 获得签名
* @param string $path 保存路径
* @return json
*/
public function get_sign($path = '') {
$now = time();
$expire = 300000; //设置该policy超时时间是30s. 即这个policy过了这个有效时间,将不能访问
$end = $now + $expire;
$expiration = $this->gmt_iso8601($end);
//最大文件大小.用户可以自己设置
$condition = array(0=>'content-length-range', 1=>0, 2=>10485760000);
$conditions[] = $condition;
//表示用户上传的数据,必须是以$dir开始, 不然上传会失败,这一步不是必须项,只是为了安全起见,防止用户通过policy上传到别人的目录
$start = array(0=>'starts-with', 1=>$this->oss_key_secret, 2=>$path);
$conditions[] = $start;
$arr = array('expiration'=>$expiration,'conditions'=>$conditions);
//echo json_encode($arr);
//return;
$policy = json_encode($arr);
$base64_policy = base64_encode($policy);
$string_to_sign = $base64_policy;
$signature = base64_encode(hash_hmac('sha1', $string_to_sign, $this->oss_key_secret, true));
$response = array();
$response['accessid'] = $this->oss_key_id;
$response['host'] = $this->oss_host;
$response['policy'] = $base64_policy;
$response['signature'] = $signature;
$response['expire'] = $end;
//这个参数是设置用户上传指定的前缀
$response['dir'] = $path;
echo json_encode($response);
return ;
}
function gmt_iso8601($time) {
$dtStr = date("c", $time);
$mydatetime = new \DateTime($dtStr);
$expiration = $mydatetime->format(\DateTime::ISO8601);
$pos = strpos($expiration, '+');
$expiration2 = substr($expiration, 0, $pos);
return $expiration2."Z";
}
}
上传文件
/**
* 上传文件操作
*/
class AliossdController extends FwadminController {
/*
public $ossconfig = array(
public $ossconfig = array(
'id'=>'',//Access Key ID
'key'=>'', //Access Key Secret
'bucketname'=>'xxxx', //bucket名称
'host'=>'https://xxxx.oss-cn-beijing.aliyuncs.com', //上传提交地址 格式:bucketname+区别+阿里的域名
'expire' => 30, //过期时间
'callback_body' => array(
'callbackUrl'=>'', //回调地址全地址含有参数
'callbackHost'=>'', //回调域名
'callbackBody'=>'filename=${object}&size=${size}&mimeType=${mimeType}&height=${imageInfo.height}&width=${imageInfo.width}', //阿里返回的图片信息
'callbackBodyType'=>'application/x-www-form-urlencoded', //设置阿里返回的数据格式
),
'maxfilesize'=>10485760, //限制上传文件大小 这里是10M
'imghost' =>'https://xxxx.oss-cn-beijing.aliyuncs.com', //前台显示图片的地址 格式不多说
);
public function _initialize() {
$this->ossconfig['host']= 'https://'.$this->ossconfig['bucketname'].'.oss-cn-beijing.aliyuncs.com'; //初始化上传地址
$this->ossconfig['callback_body']['callbackUrl']='https://'.$_SERVER['HTTP_HOST'].'/s****n.php/ossupload/cupload/'; //初始化回调地址
$this->ossconfig['callback_body']['callbackHost']=$_SERVER['HTTP_HOST']; //初始化回调域名
}
//获取policy和回调地址 一般使用jajx或是在加载页面的时候会用到policy和回调地址,还有传限制大小等
public function getpolicy(){
//过期时间 不得不说那个T和Z这个得注意(阿里demo的那个函数不知道就是使用不了,我这样是可以使用的)
$expire = $this->ossconfig['expire']+time();
$expire = date('Y-m-d').'T'.date('H:i:s').'Z';
//$expiration = $this->gmt_iso8601($expire);
//获取上传的路径
$dir = $this->uploadpath(I('path')); //这里要获得上传的路径有一个参数path 具体看uploadpath这个方法,根据项目自己设置
//这个就是policy
$policy = array(
'expiration' =>$expire, //过期时间
'conditions' =>array(
0=>array(0=>'content-length-range', 1=>0, 2=>$this->ossconfig['maxfilesize']), //限制上传文件的大小
1=>array(0=>'starts-with', 1=>'$key', 2=>$dir), //这里的'$key' 一定要注意
),
);
//上面的'$key' 自定义使用哪个参数来做上传文件的名称.
//而这个'$key'并不是一个值,只是告诉OSS服务器使用哪个参数来作为上传文件的名称
//注意是全路径,比如前端上传图片的使用提交的地址中&key=upload/images/20160127${filename}
//那么在上传图片的时候就要拼接出key的路径然后和图片一起提交给oss服务器
//你上传的图片的名子是5566.png ,那么保存在oss的图片路径 就是upload/images/201601275566.png;
//而后面的$dir 就是upload/images/
$policy = base64_encode(json_encode($policy));
$signature = base64_encode(hash_hmac('sha1', $policy, $this->ossconfig['key'], true)); //签名算法
$res = array(
'accessid'=>$this->ossconfig['id'],
'host' =>$this->ossconfig['host'],
'policy' => $policy,
'signature'=>$signature,
'expire' =>$expire,
'callback' =>base64_encode(json_encode($this->ossconfig['callback_body'])),
'dir' =>$dir,
'filename' =>md5(date('YmdHis').rand(1000,9999)), //我这里使用时间和随时数据作为上传文件的名子
'maximgfilesize'=>307200, //前端JS判断 可以上传的图片的大小 这里是300K
);
$this->ajaxReturn(array('status'=>0, 'msg'=>'', 'config'=>$res),'json');
}
//回调处理方法 这里使用OSS demo里的东西,但demo里有个坑就是一定要告诉其内容长度 content-lenght的值具体看 _msg()方法
//这里面还有一些设置可以查看OSS接口说明的地方,我这里没有设置,可以获到头部的信息
public function cupload(){
$authorizationBase64 = '';
$pubKeyUrlBase64 = '';
if(isset($_SERVER['HTTP_AUTHORIZATION'])){
$authorizationBase64 = $_SERVER['HTTP_AUTHORIZATION'];
}
if (isset($_SERVER['HTTP_X_OSS_PUB_KEY_URL'])){
$pubKeyUrlBase64 = $_SERVER['HTTP_X_OSS_PUB_KEY_URL'];
}
if ($authorizationBase64 == '' || $pubKeyUrlBase64 == ''){
//header("http/1.1 403 Forbidden");
$this->_msg(array("Status"=>"error",'msg'=>'上传失败,请重新上传'));
}
//获取OSS的签名
$authorization = base64_decode($authorizationBase64);
//获取公钥
$pubKeyUrl = base64_decode($pubKeyUrlBase64);
$ch = curl_init();
curl_setopt($ch, CURLOPT_URL, $pubKeyUrl);
curl_setopt($ch, CURLOPT_RETURNTRANSFER, 1);
curl_setopt($ch, CURLOPT_CONNECTTIMEOUT, 10);
$pubKey = curl_exec($ch);
if ($pubKey == ""){
//header("http/1.1 403 Forbidden");
$this->_msg(array("Status"=>"error",'msg'=>'上传失败,请重新上传'));
}
//获取回调body
$body = file_get_contents('php://input');
//拼接待签名字符串
$authStr = '';
$path = $_SERVER['REQUEST_URI'];
$pos = strpos($path, '?');
if ($pos === false){
$authStr = urldecode($path)."\n".$body;
}else{
$authStr = urldecode(substr($path, 0, $pos)).substr($path, $pos, strlen($path) - $pos)."\n".$body;
}
//验证签名
$ok = openssl_verify($authStr, $authorization, $pubKey, OPENSSL_ALGO_MD5);
if ($ok == 1){
//增加对上图片的类型的判断
if(!in_array(I('mimeType'), array('image/png', 'image/gif', 'image/jpeg'))){
$this->_msg(array("Status"=>"error",'msg'=>'不支持的文件类型'));
}
//if(I('size')>$this->ossconfig['maxfilesize']){
if(I('size')>512000){
$this->_msg(array("Status"=>"error",'msg'=>'上传图片过大,无法上传'));
}
$this->_msg(array("Status"=>"Ok",'msg'=>'','pic'=>$this->ossconfig['imghost'].I('filename')));
}else{
//header("http/1.1 403 Forbidden");
$this->_msg(array("Status"=>"error",'msg'=>'上传失败,请重新上传'));
}
}
//返回要上传的路径 注意这里的路径 最前最不要有/符号,否则会出错
public function uploadpath($type){
switch ($type) {
case '1':
$patch = 'Upload/images/';
break;
}
return $patch;
}
public function gmt_iso8601($time) {
$dtStr = date("c", $time);
$mydatetime = new DateTime($dtStr);
$expiration = $mydatetime->format(DateTime::ISO8601);
$pos = strpos($expiration, '+');
$expiration = substr($expiration, 0, $pos);
return $expiration."Z";
}
public function _msg($arr){
$data = json_encode($arr);
header("Content-Type: application/json");
header("Content-Length: ".strlen($data));
exit($data);
}
//删除图片或文件信息 这里有个坑就签名算法这块
//这个删除是单一文件删除,估计批量删除可以就没有问题了
//单一图片删除使用delete 所以传递的内容为空,就不要使用md5加密
//然后删除成功了,OSS服务不返回任务内容 坑
//还有就是地址这块在算签名的时候一定要加个bucketname这点最坑
public function delosspic($picurl){
if(empty($picurl)){
return array('status'=>1, 'msg'=>'要删除的图片不能为空');
}
if(strpos($picurl, $this->ossconfig['host'])===false)
{
$picurl = trim($picurl,'/');
$url = $this->ossconfig['host'].'/'.$picurl;
$picurl = '/'.$this->ossconfig['bucketname'].'/'.$picurl;
}
else{
$url = $picurl;
$picurl = str_replace($this->ossconfig['host'], '', $picurl);
$picurl = trim($picurl, '/');
$picurl = '/'.$this->ossconfig['bucketname'].'/'.$picurl;
}
$url = str_replace('https', 'http', $url);
$gtime = gmdate("D, d M Y H:i:s").' GMT'; //一定要使用 http 1.1 标准时间格式
//签名算法不多说官网的例子也只能无语,没有PHP版的。本人这个可以使用验证通过,可以正常删除文件
$signature = base64_encode(hash_hmac('sha1',"DELETE\n\ntext/html\n".$gtime."\n".$picurl, $this->ossconfig['key'], true));
//传递头这里也是坑 上面使用了 text/html靠,在协议头里还得加上,要不然会提示出错。
$headers = array(
'Authorization: OSS '.$this->ossconfig['id'].':'.$signature,
'Date:'.$gtime, //靠时间也得带上
'Content-Type: text/html', //传递类型要与上面签名算法一致
);
$ch = curl_init();
curl_setopt($ch, CURLOPT_URL, $url);
curl_setopt($ch, CURLOPT_HTTPHEADER, $headers);
//curl_setopt($ch, CURLOPT_HEADER, 1);
curl_setopt($ch, CURLOPT_CUSTOMREQUEST, 'DELETE');
curl_setopt($ch, CURLOPT_RETURNTRANSFER, 1);
curl_setopt($ch, CURLOPT_CONNECTTIMEOUT, 5);
curl_exec($ch);
//靠,OSS删除文件不返回结果,没有返回结果就表示删除成功,反之会有删除出错信息
}
//测试删除一个图片文件
public function del_file(){
$url = I('url');
$this->delosspic($url);
echo '1';
}
}
四、其他js 前端文件
https://pan.baidu.com/s/1P6nZ5iL_AR2U3nZpmfQ5AQ
提取码:ege2


